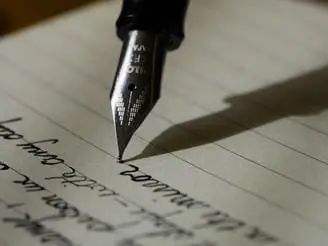
Many people are taking up calligraphy as a hobby. An elegantly written note merits a second glance. The note would have been written and 90% of the time with a pen containing free-flowing ink. Calligraphy can be written in an old-fashioned way by dipping a quill pen into the inkbottle. A quill is made by inverting a bird feather and sharpening the base of the shaft called the calamus. Different types of manuscript pens are available now.
A serious user of calligraphy should know how to set up a calligraphy pen to get maximum output. There are different types of calligraphy pens with very different anatomy. The common parts that a manuscript pen can have are enumerated below:
i. The cap.
ii. The barrel.
iii. The nib.
iv. The feed.
v. The section.
vi. The convertor.
Each of these parts has sections with names for easy identification. A user should have basic knowledge of the basic tools used in creating calligraphy. After taking up calligraphy, it is very important to learn how to set up a calligraphy pen.
Assembling A Manuscript Calligraphy Pen
The manuscript has manufactured high-quality calligraphy pens for more than a century and a half. A user of manuscript products should have basic knowledge about how to set up a calligraphy pen.
Once you have chosen your pick from the vast array of modern manuscript pens available, it has to be unboxed before setting it up for use. The common types of pens are:
i. Felt tip pens.
ii. Fountain pens.
iii. Dip pens.
iv. Brush pens.
Let us learn to set up a classic fountain pen that comes with different tips for various styles.
Inserting the Ink Cartridge into the Pen
i. Study the nib closely and understand that it has a pointed end and a flat end. The ink comes out through the pointed end to contact with the paper.
ii. Push the non-pointed end of the nib hard into the cartridge. A click sound will confirm that the attachment is successful.
iii. Insert the cartridge into the barrel and turn anti-clockwise to close.
Tip: As you get used to the pen, you can switch between cartridges and ink.
Setting Up An Ink Converter
Only fountain pens have ink convertors. Unlike an ink cartridge, a convertor can be refilled.
i. Unscrew the barrel from the body of the pen.
ii. Hold the pen vertically above the ink bottle with the nib pointing down. The nib shouldn’t touch the ink at this point.
iii. Push the plunger towards the nib and pull back. Repeat the process a few times till you are satisfied that there is no air inside the convertor. Any old ink left inside will also get cleared.
iv. Immerse the nib about three fourth into the ink with the plunger pushed down.
v. Pull the plunger back very slowly with the nib in the same position immersed in the ink bottle.
vi. Hold the pen up against a light source to ensure that the cartridge is full and there are no air bubbles.
vii. Squeeze a drop of ink back into the bottle to get rid of any tiny air bubbles and ensure smooth ink flow.
viii. Insert the cartridge back into the barrel and screw tight.
ix. Make several upward and downward strokes on a piece of paper till you are sure that the operation is smooth.
Tip: Wipe the base of the pen after filling ink to get rid of any ink drops that might have accidentally got there.
i. Check to ensure that the nib and reservoir assembly are properly. In a correctly attached assembly, the tip of the nib shall maintain a distance of 2 mm from the reservoir.
ii. It is very important to take steps to ensure that ink doesn’t dry in the reservoir. Unlike fountain pen ink, dip pen inks have more pigmentation. If the ink dries inside the reservoir it will block the flow into the nib. Setting Up A Dip Pen
iii. Experienced users always wash the nib and reservoir in lukewarm water after every stretch of use.
iv. In case, the ink gets wedged during a session, wash them and dry using a soft cloth or paper napkin to continue the job.
Tip: Do not put the nib or reservoir inside the sink. They can get washed down the drain. Keep a separate bowl for soaking the nib and reservoir.
Setting Up A Quill Pen
The process is very simple and involves only the removal and insertion of the nib.
i. Grip the tubular piece of your quill pen strongly with one hand. Hold the nib with the thumb and index finger of the other hand. Gently pull out the nib.
ii. Insert the flat end of the new nib into the tubular piece and push very slowly and gently.
iii. The nib will cease to move when it reaches the notch of the tube.
Setting Up a Brush Pen
Brush pens have thinned out tips that are very flexible like a real brush. With the right application of pressure, it is very easy to create thin upstrokes and thick downstrokes with a brush pen. These are essentially marker pens with special tips for calligraphy. The brush pen will need maintenance if the brush nib hardens. It can happen due to two reasons:
i. The ink dried on the brush blocking the flow of fresh ink.
ii. The pen was left unused for a long time, causing the ink to dry inside the cartridge.
This can be taken care of by following the below steps:
i. Take out the ink cartridge. Do not detach the metal part or remove the brush. This can cause the ink to leak.
ii. Submerge the tip of the brush in lukewarm water for a few hours.
ii. When the water gets murky- change it.
iii. Continue the process till only clear water is left in the bowl. This can take anywhere from a day up to five days depending upon your brush tip condition.
iv. Rinse the brush under running water for about a minute or two.
v. Pat dry with a soft absorbent cloth or tissue.
vi. Hang it in shade for a day for the brush to dry naturally. Using a wet brush will cause the ink to leak.
vii. The quality of strokes that the cleaned brush will make initially will be weak. It will take some time for the ink to fill up the brush. Before beginning your calligraphy work, draw on a piece of paper till the strokes get bold enough.
Brush pens manufactured by Manuscript can be well cared for if you know how to set up a calligraphy pen.
Setting Up a Felt Tip Pen
Felt tip pens are known for their loud colors. They are more prone to getting damaged due to the nature of their parts. The basic issues faced by users of felt tip pens are:
i. Felt tips can split forming uneven surfaces.
ii. Dried ink inside the cartridges.
A user can easily fix these problems in simple steps. They are not permanent solutions but will provide enough durability to complete an ongoing assignment.
1. Settling Dried Ink Issues.
i. Hold the closure cap on top with tweezers and pull it out.
ii. Use the same tweezers to pull out the ink cartridge.
iii. Soak the felt cartridge inside a glass of water for less than a minute.
iv. Take out the cartridge with tweezers and put it on a paper napkin that absorbs moisture well. Wrap the paper around the cartridge so that all the water on the surface is removed.
v. Put the cartridge back into the casing of your felt tip pen.
vi. Seal the top with the closure cap.
vi. Immerse the tip of the pen in water for thirty seconds.
vii. Draw or write on a piece of paper till the ink starts o flow smoothly.
2. Repairing Split Tips Of Felt Pens.
This too is a temporary solution to mend uneven tips.
i. Use a sharp paper cutter or shaving blade to cut across the uneven tip and form a new and sharp-pointed finish.
ii. Use small scissors to trim off stray fibers that mar your writings.
iii. In case of a very untidy mess, pull out the felt tip with tweezers and trim it carefully to form a pointed tip.
Tip: Small nail trimming scissors are excellent to use on thin tips of felt pens.
Tips And Techniques To Tackle Ink Flow Issues
Immediately after assembling a pen, the ink flow will not be smooth. Many times the tone of the ink on the paper may not display the intended hue of the color. Knowhow about how to set up a calligraphy pen will allow the user to take care of most ink flow problems. Below are a few time tested quick fix methods:
i. Hold the pen vertically over a piece of paper with the nib pointing downward. Gently tap the paper allowing the pen to fall freely on to it.
ii. Move the flat side edge of the nib against a paper and move the pen sideways. This is also employed as a testing method to assess the quality of the manuscript pen.
iii. Draw downward strokes on a piece of paper while applying gentle pressure. Pressing too hard can cause the nib to distort or even break. iv. Remove the barrel so that the nib remains attached to the cartridge. Squeeze the cartridge gently till a drop of ink comes out of the nib.